Introduction
Welcome to the fifth project in our 10 Best React JS Projects For Beginners In 2023 journey. It appears that we are going to continue the rest of the projects in 2024! 🙂
This comprehensive tutorial will show you how to build an interactive and user-friendly flashcard application with an engaging UI/UX. The technologies to build this React JS application include Next.js, TypeScript, and TailWind CSS. Leveraging flashcards is an effective method to add an element of interest to your study routine. Their interactive and visually stimulating feature makes it possible to have quicker memorization, ensuring the information remains in your mind for a longer duration. (As a personal anecdote, I remember I participated in a program that utilizes flashcards to increase word recognition ability!)
As I was browsing some APIs to use for our flashcard application, I stumbled upon an API called ‘Quiz API‘. It turns out this API has lots of technical questions and answers with various IT-related topics, which is perfect for us!
Design And Requirements
This section shows the design and requirements that need to be implemented to build the flashcard application.
If you want to build the application on your own without following the guide, you can refer to this section to successfully build the flashcard application.
NOTE: The design doesn’t have to be exactly the same as the application I built. If you think the application would look better with a certain layout, colors, themes, etc, you can change the styles as you prefer.
Design
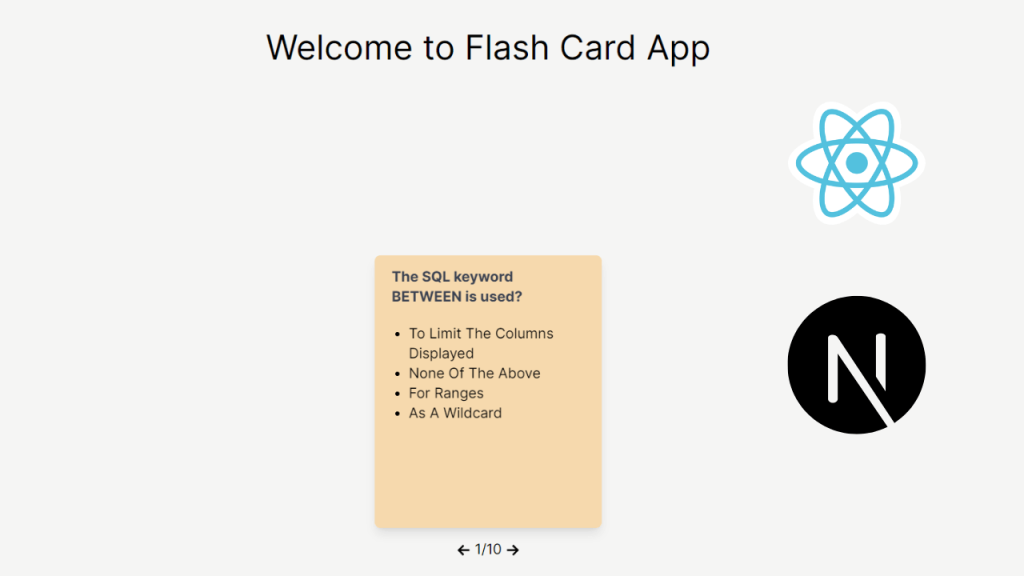
The image below is the final outcome of our flashcard application.

I can’t give you every single detail of CSS styles here since that’s going to make the post too long, however, these are the main styles that would give your application a similar look to mine.
– App background color: bg-stone-100
– Flashcard background color: bg-orange-200
– Question and answer text styles: text-gray-700, text-base, font-bold, text-xl
– Icons for buttons: GrFormPreviousLink and GrFormNextLink from react-icons
– Icon for loader: AiOutlineLoading3Quarters from react-icons
Requirements
These are the requirements of the flashcard application.
The flashcard application can:
– Display a question when the card is rendered
– Reveal the answer when the card is hovered over, triggering a flip animation
– Navigate to the next or previous question and answer when the corresponding button is clicked
– Indicate loading with a loader icon and a message while fetching data
With the design and requirements all laid out, let’s get to the hands-on coding and start building the flashcard application.
Every step through this tutorial will include corresponding code examples so that you can see what I’ve done and follow through. However, if you decide to just read it through and check out the code I’ve written, you can visit the flashcard Github repo.
Setting Up Next.js App
We are going to use Next.js to build our application. As you might have heard Next.js is a very popular (perhaps the most popular nowadays) React JS framework. There are various selling points that Next.js promotes such as server-side rendering, SEO improvement, etc. However, I won’t get into the details on this since you can probably find very detailed answers over online.
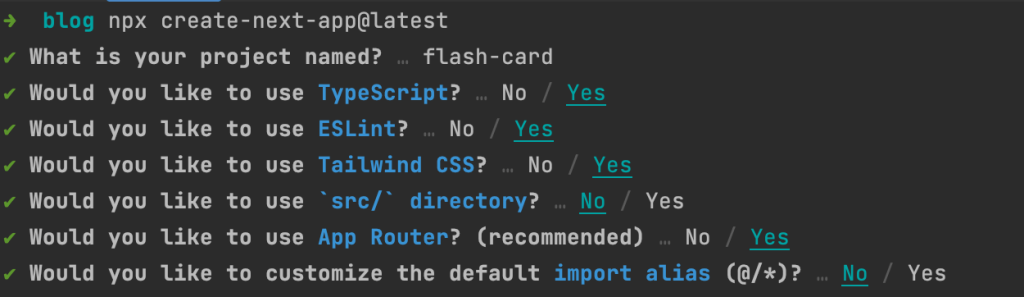
Below are the steps to set up the Next.js application.
npx create-next-app@latestThen, you will see some prompts that ask some questions regarding project configuration. You can accept the default values for all the questions.
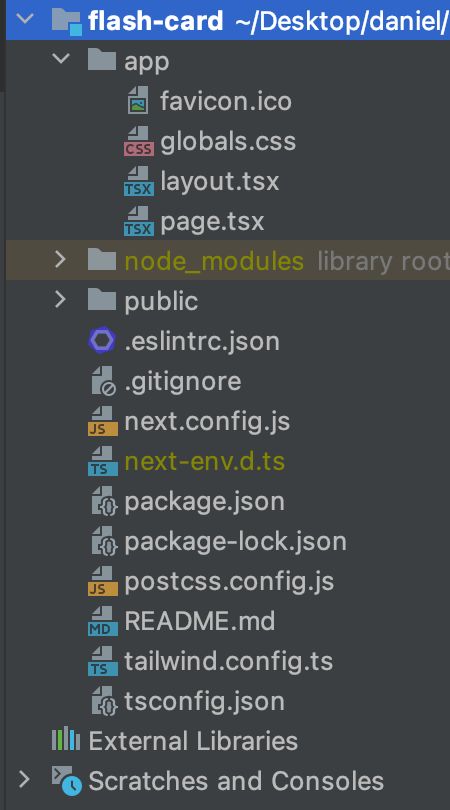
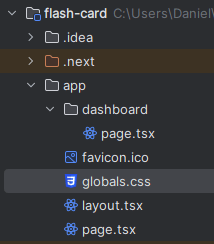
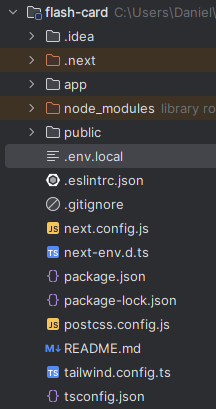
Once the process is successfully finished, you should be able to see the project folder structure like the below image.
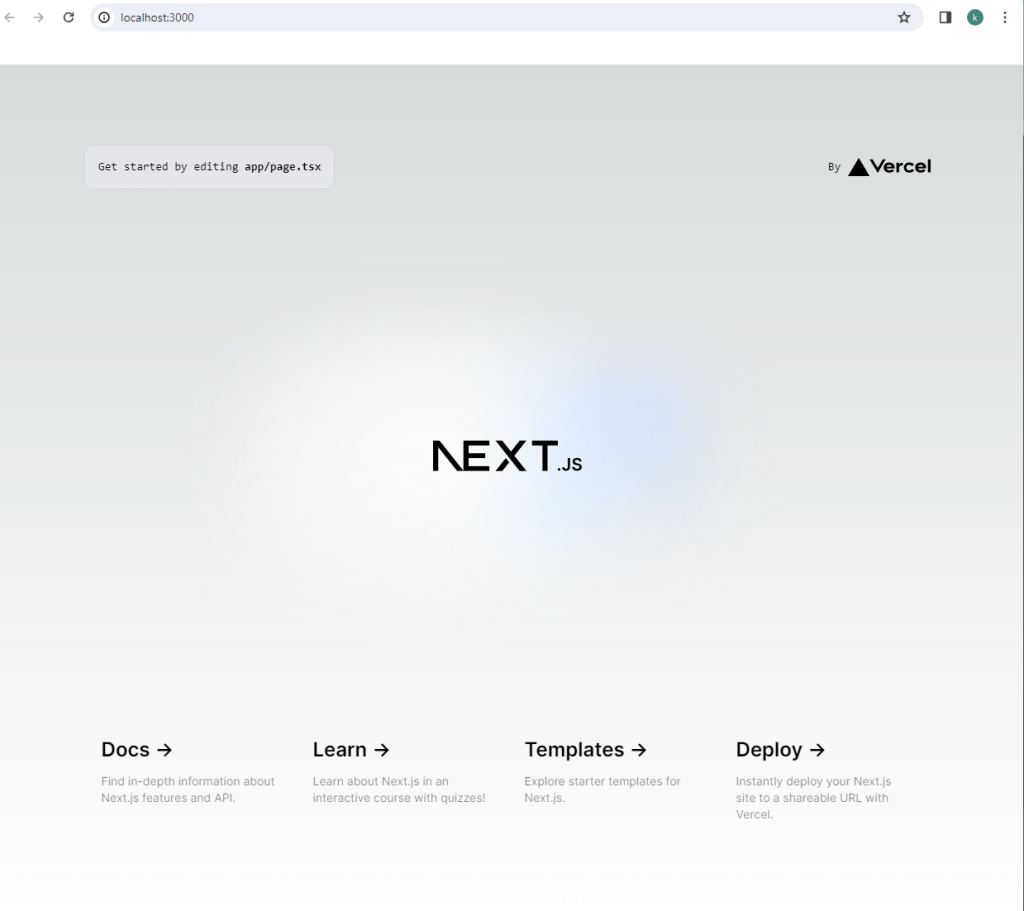
You can now go into the project folder that you just created and fire up the local Next.js server!
cd flash-card
npm run dev
If you click on the link (http://localhost:3000) that’s provided or type it in the browser URL, then you should be able to see the bootstrapped Next.js page.
Disabling Strict Mode
React JS has the strict mode turned on by default for the development environment, which means that it will render components twice. This naturally means that the application is going to make an API call twice as well.
Generally, keeping strict mode turned on is good thing for development purposes, however, it’s rather unnecessary for our application to make an API call twice with no good reason.
If you decide to keep strict mode on, later in the tutorial when we make an API call, you would be able to see the first API call gets automatically cancelled. One another issue that I spotted with the strict mode enabled for this project is that since the first API call automatically is cancelled, the first call would be recognized as ‘failed to fetch data‘.
So, for the sake of avoiding redundancy, let’s disable the strict mode in this project. In order to disable the strict mode, we need to modify the next.config.js file.
Create Dashboard Page
Let’s create our main (and only) page in our application. We are going to call this page ‘dashboard‘. This means that we need to create a route that is http://localhost:3000/dashboard.
In Next.js, routing is like organizing files in folders. Normally, in a React JS app, we would have to specify which URL maps to which page or component. However, Next.js takes care of this process entirely (with some conditions) for us. I will explain as we go.
Before we start building the dashboard page, let’s remove the global CSS styles that are already applied by Next.js. Remove everything in globals.css file except these three lines.
@tailwind base;
@tailwind components;
@tailwind utilities;
Now we should be able to build our application with clean slate of styling. As a next step, let’s create a folder called dashboard under the app folder and add a file page.tsx.
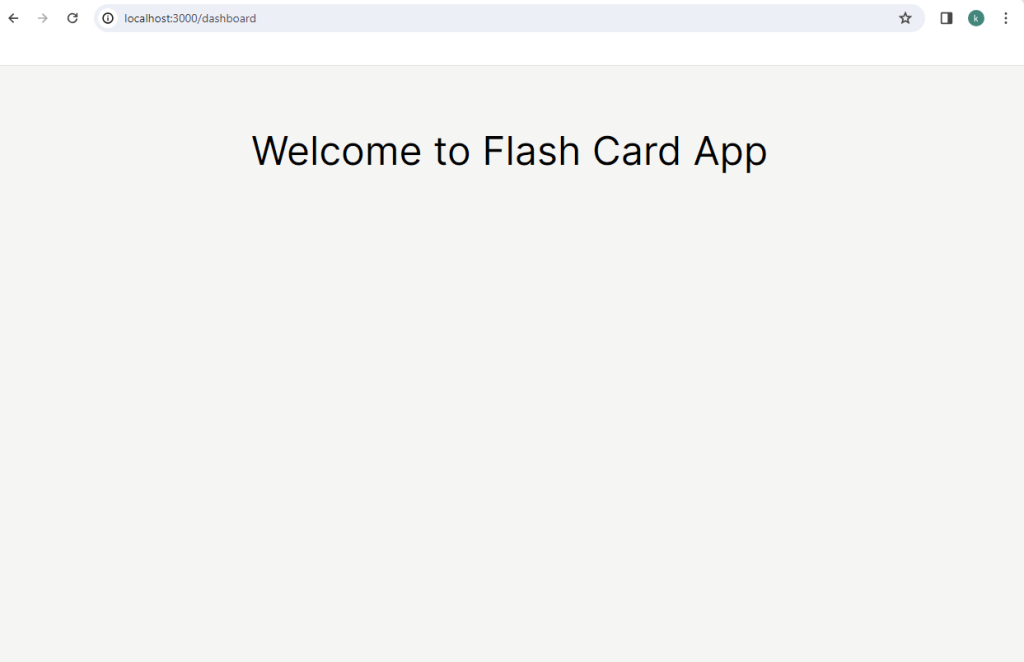
Once we have the page.tsx, let’s put some basic content as a placeholder.
Now, if you go to dashboard page by typing http://localhost:3000/dashboard in browser URL, then we should be able to see the welcome message successfully. Yay!
As you might have already noticed, the dashboard folder we added under the app folder became our route (/dashboard). What a handy feature! But there is one condition that is required to make this possible. In order for the folder to be a route, it needs to have either page.ts(x) or route.ts(x) (or page.js(x) or route.js(x) for JavaScript) under the folder.
Create Flashcard
Implement the Flashcard structure
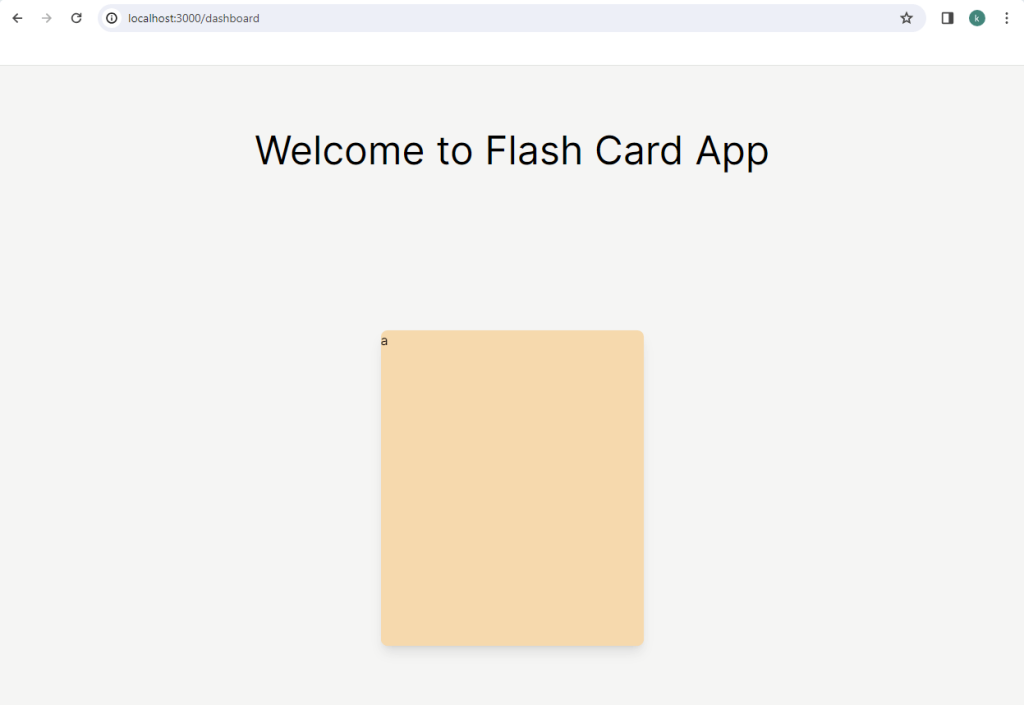
We are going to build the structure of the flashcard with a bit of styling in this section. Let’s add some HTML code and CSS styles that would give us a card shape in the page.tsx under the dashboard folder.
Your application would look like this now:
Refactor the code into the Flashcard component
To maximize the benefit of re-usability of React, it’s always good to make a separate component for the future usage.
We can make a component called Flashcard.tsx under the dashboard folder. Then copy the code that we just wrote and paste into the Flashcard.tsx.
Then, we can simply use this component in the page.tsx.
Make sure your application is working as intended after you make a change always.
Fetch Data From Quiz API
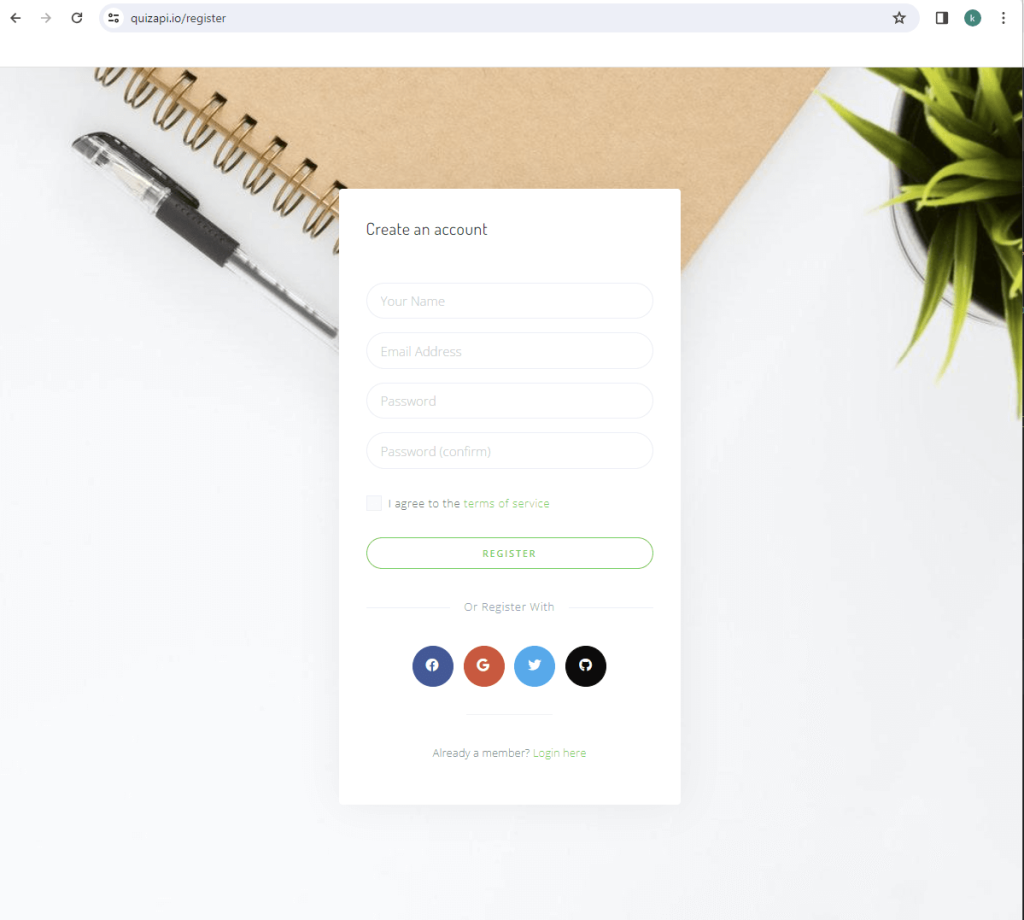
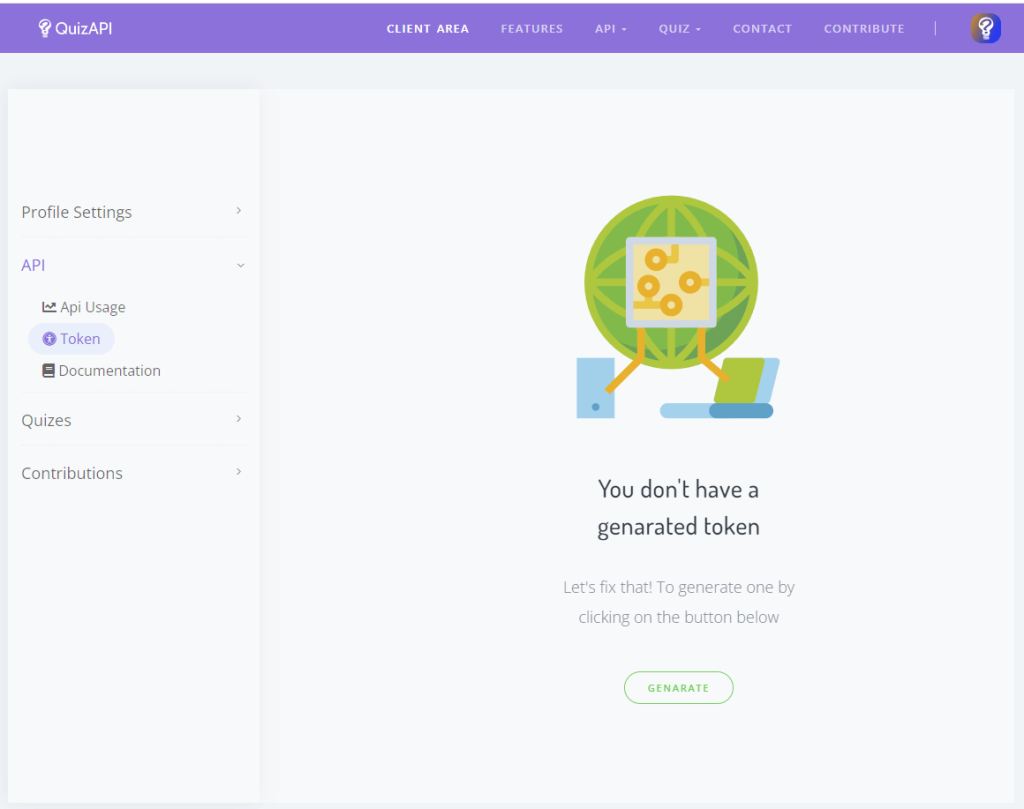
Sign up and obtain the API key
Register and generate the API key
The questions and answers we are using to display in the flashcard application are from an API called Quiz API. Here is the official documentation of Quiz API.
First things first, you would need to sign up on the website so that you can generate an API key. You can manually input your information or sign up with the single sign-on feature.
Next, we need to obtain an API key so that we can make REST API calls.
Perfect! Before we start making API calls, let’s do one more thing. The API key is a confidential info and needs to be kept safe. As you might know, using .env file is one way to keep the environment variables or secrets safe in the application.
Store the API key in .env.local file
Create a file called .env.local under the root folder.
Then we can store the API key that we generated from Quiz API in a variable.
Implement the custom hooks to fetch data
Implement the useData.ts hook
Are you having hard time to think of what hooks are? How about useState or useEffect? Do they sound familiar to you? If they are, you are already know what hooks are :).
The useState and useEffect are built-in hooks that React provides. With the same concept, we can create our own custom hooks.
Let’s create a folder called hooks under the app folder. Then, create a file called useData.ts.
But, wait, didn’t I say that Next.js will create a route following folder names? Does this mean that we are going to have a route /hooks? The answer is ‘no‘. Like I mentioned above, in order for the folder to be a route, we need either the page.tsx or route.tsx.
The code above looks intimidating, but don’t worry. I will explain.
We are going to have three states – data, error, and loading. The useEffect hook will be kicked off right away whenever the useData hook is used (or called) somewhere else in our application.
Before we make an API call, we are setting isLoading state as true since this is going to be used to display loading icon and message. Then we are using the fetch API to send a request. In the first .then handler, we are returning the response as JSON format, otherwise, we are throwing an error. In the second .then handler, we are setting the data state with the JSON format data from the first .then callback as well as isLoading state to false. The catch block is executed when we throw an error.
NOTE: the controller and signal are used to abort the fetch request. For example, when the component dismounts or when a user manually cancels the request. This way, we can save some resource usage by ending it earlier.
Awesome, now let’s run a quick test if our useData hook is working. Use the useData hook inside the Flashcard component and log the result on the console.
There are couple things to note here. First, we are grabbing the value of API key by using process.env.NEXT_PUBLIC_QUIZ_API_KEY. Second, be aware that I’ve added "use client"; on top of the Flashcard component. Let me explain why.
The default rendering of Next.js is server-side rendering. We are calling useData hook when we render the Flashcard component. Since we are fetching the data during the rendering process, it’s considered as client-side rendering. So, if we don’t have the "use client"; in the Flashcard component, it will complain.
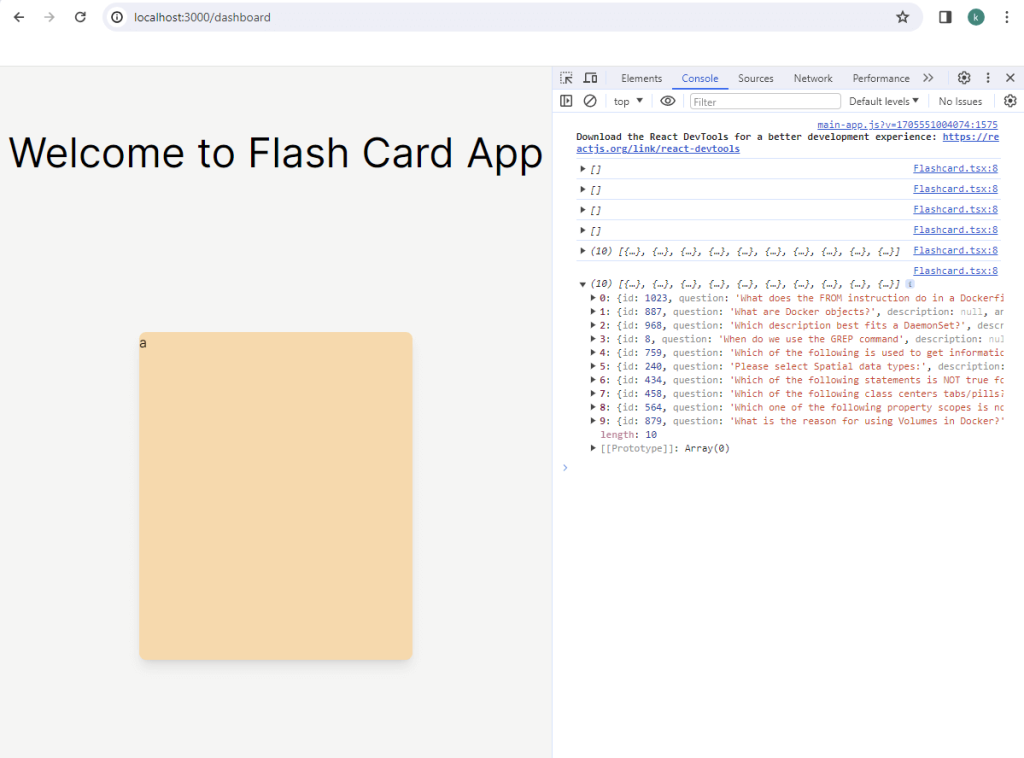
If you successfully implemented the code, when you inspect the page, you should be able to see an array of objects in the logging.
Implement the useQuiz.ts hook
Technically, we could have just used the useData.ts in our application and be done with it. However, I always ask myself a question, “What if the application grows in size and we would need a similar feature?”. So, I decided to create another hook which is specifically for the quizzes.
Let’s create a file called useQuiz.ts under the hooks folder.
In TypeScript, there is a syntax called interface. This syntax allows us to define the structure of an object by specifying properties or methods inside. In our case, if we want to create an object of type Quiz, we are specifying that the object needs to have the question, answers, and correct_answers properties.
Now, if we want to fetch the quiz data from the Quiz API, we can use useQuiz hook instead of useData hook. i.e. const { data, error, isLoading } = useQuiz();
Display a question and an answer on Flashcard
By now, if you were able to follow along, you should be able to fetch the data and have a Flashcard component (orange box). It’s time to display questions and answers on the flashcard.
Display the first question and answer
Let’s modify the Flashcard component so that we can display the first question and answer.
What has changed from the above Flashcard.tsx compared to earlier basic Flashcard.tsx? Let’s go through the code together.
We created an interface ICard so that we can instruct TypeScript that we want the currentCard state to have this structure. Then, we have two useEffect hooks being used. First useEffect is dependent on the data state. Once we have data, this useEffect will kick off and set the first item from the data as the currentCard. Second useEffect is dependent on the currentCard state and it will execute the findAnswer function.
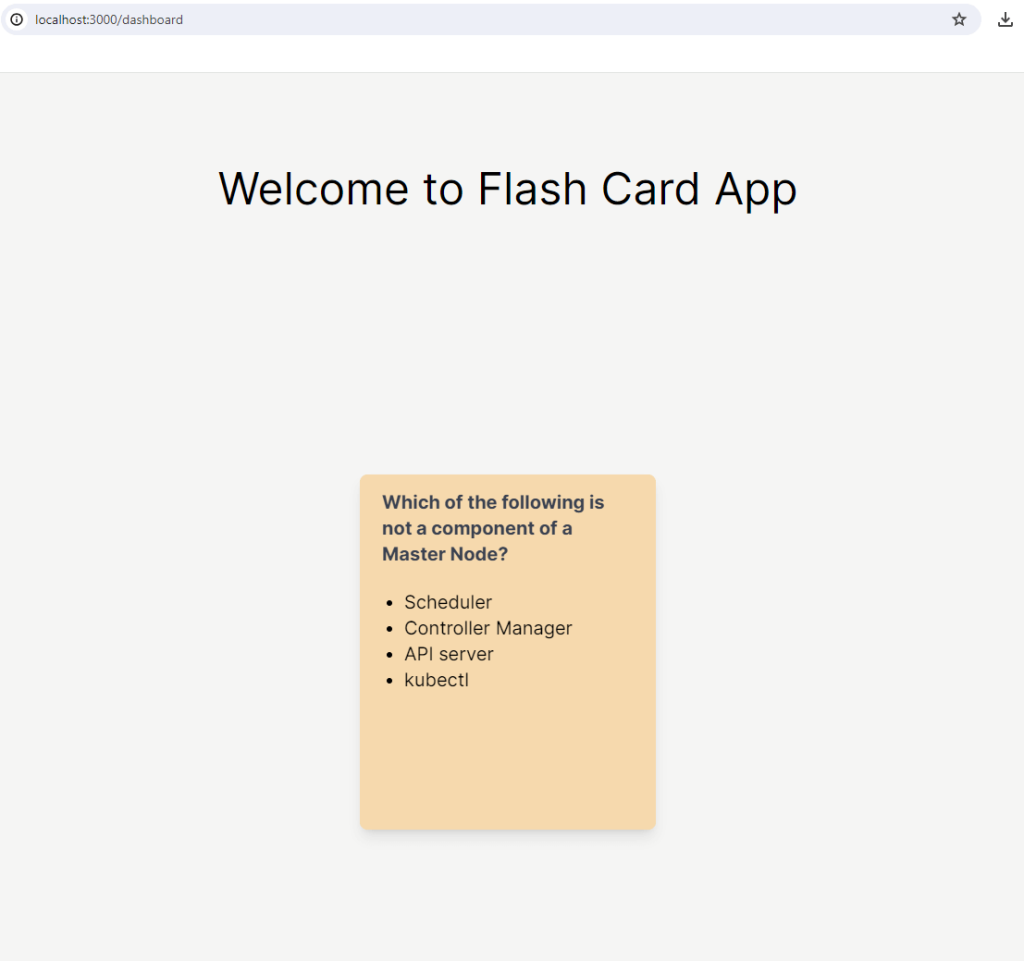
Great job on following along so far! If everything was implemented correctly, you should be able to see a question on the front side of the card and an answer on the back side of the card.
Implement Previous And Next Buttons
Currently, we are storing 10 questions and answers in our application once we make an API call. From previous section, we were able to display the very first question/answer on the card. Now, let’s implement a previous and a next button so that we can display other questions and answers as well.
Let’s implement the previous and next buttons right below the Flashcard component. Like previous tutorials, we are going to use react-icons to grab the icons. Install the react-icons npm package.
npm install react-icons --saveThen we can use the icons.
Here is how the application looks like after inserting the buttons.
Now that we have previous and next button icons, we need to implement the onClick functions so that we can navigate among questions and answers. If we click the previous button, it will display the previous question/answer, and next question/answer for the next button (obviously!).
We have added the currentIdx state to track which question and answer we are currently at. Then we have added two onClick handlers by using the value of the currentIdx state.
If you press the previous or the next button, you should be able to see the question/answer changing.
Let’s clean up the code and refactor before we move further. Right now, we have most of code in the Flashcard component. We are going to separate the navigation buttons into a separate component. Create a file called CardNavigation.tsx under the dashboard folder.
Then, we can use the CardNavigation component in the Flashcard component.
The Flashcard.tsx looks cleaner and has shorter lines of code.
On top of this refactoring, let’s do one more refactoring. The CardNavigation.tsx has <button> elements in it. We can create a separate Button component and use it in the CardNavigation component.
Create a folder called components under the app folder. Then, create a file called Button.tsx under the components folder.
There is going to be generic code that uses <button> element in the Button component.
Then, we can use this Button component inside the CardNavigation component.
Although it seems like it’s unnecessary, imagine the cases that there are different types of buttons. For example, there could be buttons that only have icons inside, or icons and text both.
Awesome! Although the user is now able to change the question and answer, they won’t be able to know how many questions are available or what question/answer they are looking at. Having a pagination would let us solve this issue.
Implement Pagination
We are going to display which question/answer the user is viewing along with the previous and next buttons. i.e. <- 1/10 ->
In order to make this work, we would need to pass the total count of question/answer and the currentIdx to the CardNavigation component.
First, let’s pass the necessary information to the CardNavigation component from the Flashcard component.
Next, take the passed information and use it in the CardNavigation component.
You can try clicking on the previous and next button. You will be able to see the number changing.
Good job on following through the tutorial! Our application is functionally complete. But since the application relies on the external REST API, there are some potential issues while fetching the data. For example, Quiz API is down or slow because it’s having an issue. Considering the situations like these, we need to somehow let the user know something’s wrong.
Implement Loader
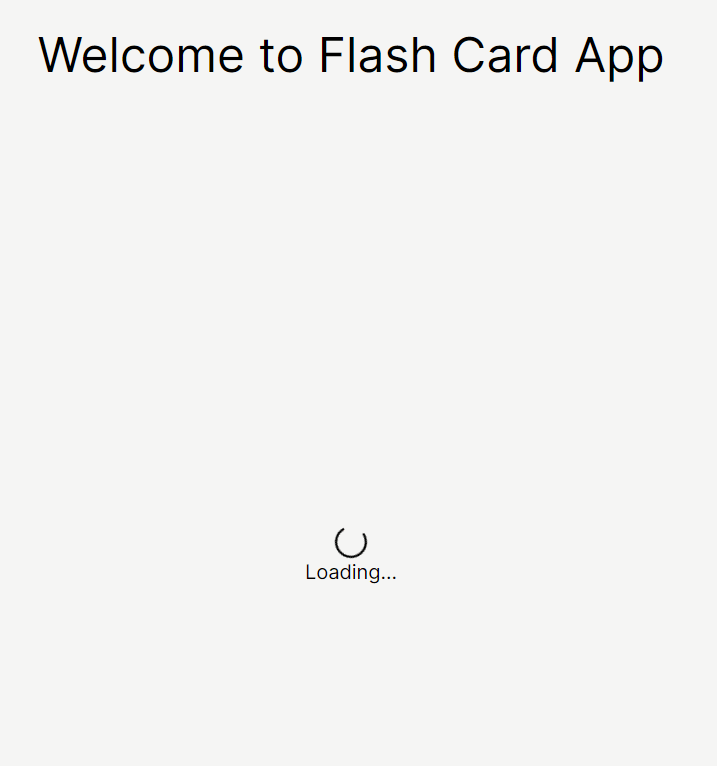
Add the loading icon and the message
Let’s add an icon and some message when we are in the progress of fetching the data from the Quiz API.
Create a file called Loading.tsx under the components folder.
Then, we can use this component in the Flashcard component.
We can see the loading icon circling and a message while the data is being fetched.
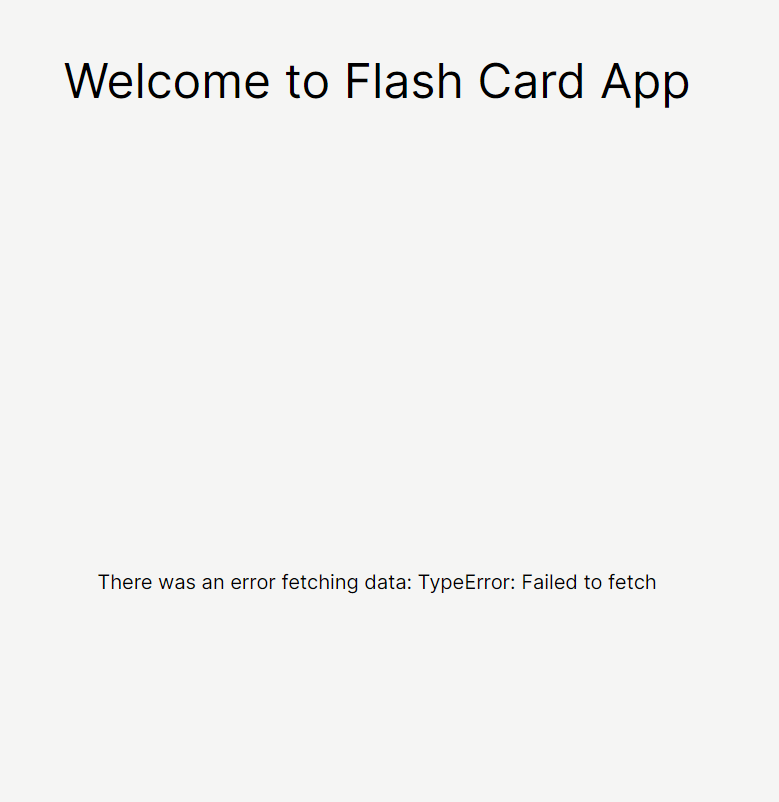
BONUS: Notice that we also added {error && <p className="text-xl">{error}</p>} above {isLoading && <Loading />}. This is to show an error message when we actually fail to fetch the data from API. You can test this by changing the URL of the REST API. i.e. "https://quizapi-fail-to-fetch.io/api/v1/questions"
Conclusion
Great job on making it through until the end! This is the end of our fifth React JS step-by-step tutorial.

From this tutorial, we were able to learn the following:
– How to set up React JS application featured by Next.js
– How to build a button that can be flipped
– How to build a pagination with icons
– How to refactor code as separate components
– How to make an external REST API calls and deal with the data and error
If you’re aiming to improve your skills even further, you’re welcome to enhance the Flashcard application we’ve built together. Some ideas that I can think of to improve this app are like following:
– Allow users to be able to fetch more questions/answers by clicking a reload button
– Implement cleaner design for loading icon and message
– Create multiple cards that can show different topics of questions/answers
I hope you enjoyed building the Flashcard application and thank you again for reading. If you are interested in making more React JS projects for beginners, then you can check out our 10 Best React JS Projects For Beginners In 2023 post.
If you have thoughts or any feedbacks on the post, be sure to leave a comment.
I also write articles on Medium, so make sure to check them out on medium/@codingnotes.
Happy coding!